Friday, July 30, 2010

I'll give you a Pickle....

For those of you who may not know, my friend Jen and I split a CSA box. What the flip is a CSA box you may ask? It’s a Community Supported Agriculture Box which means once a week, Jen and I (along with many of our other girlfriends) strut down to the farmers market to pick up a box of produce that could feed a football team!

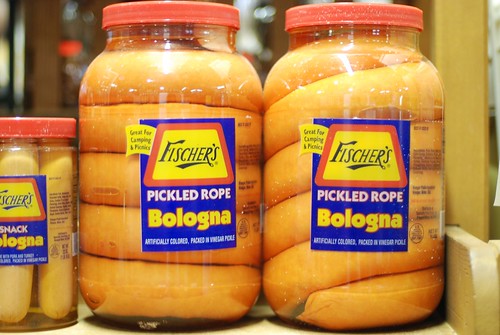
Currently, we have cucumbers out of our ears, and hell, I can only eat so many cucumbers before I feel waterlogged. Pickles, however, are a different ballgame. I love me some pickles. I really love anything pickled. In my small hometown in Kentucky, there is a common “lunch meat” - called pickle dog - that I could eat until my eyes cross. It’s pickled bologna. Yes. I said that. I could eat pickled bologna until I pass out. ( I know your opinion of me just changed, and I’m okay with it.) BUT I gave up the pig, and now can no longer have pickle dog. Every time I’m in a gas station in Kentucky, you better bet my heart yearns for that pickle dog.

Anyway, you get the point, if its pickled, I’m in. So what to do with all these cucumbers? KOSHER DILL PICKLES DUH. And I am excited.

Since I have never pickled anything myself before, I got all antsy and read 22 more recipes on pickling. After realizing that there are a babillion spices in pickle spice, (a vagillion of which I don’t have ) I decided to buy premade pickle spice. GASP. The HORROR! I know, judge me, call my agent and tell her I’m slacking. ( Her name is Sarah and I’ll give you her number if you need it.) Well do you have cassia bark in your cabinet? If so, touché. I don’t. So I consulted David Lebovitz, who consulted Arthur Schwartz. If I am making a kosher dill pickle, you better bet I am asking a Jew.


So this pickling recipe is via David Lebovitz who adapted the kosher dill pickle recipe from Arthur Schwartz’ Jewish Home Cooking

4 quarts (scant 4l) water
6 tablespoons coarse white salt (kosher, if available)
18-20 Kirby cucumbers, scrubbed
8 cloves garlic, unpeeled and lightly-crushed
2 tablespoons pickling spice
6 bay leaves
1 large bunch of dill, preferably going to seed, washed

In a large pot, heat 1 qt (1l) water with the salt until the salt is dissolved. Add the remaining water. Prepare three 1 quart (liter) wide jars by running them through the dishwasher or filling them with boiling water, then dumping it out. Pack the cucumbers vertically into the jars, making sure they're tightly-packed. As you fill the jars, divide the garlic, spices, bay leaves, and dill amongst them. Fill the jars with brine so that the cucumbers are completely covered. Cover the jars with cheesecloth, secured with rubber bands, or loosely with the lids. Store in a cool, dark place for 3 days. After 3 days, taste one. The pickles can ferment from 3 to 6 days. The longer the fermentation, the more sour they'll become. Once the pickles are to your liking, refrigerate them.


Pickling Spice
• 1/4 cup broken cassia bark
• 2 tablespoons yellow mustard seeds
• 2 tablespoons black mustard seeds
• 2 tablespoons coriander seeds
• 2 tablespoons allspice berries
• 2 tablespoons black peppercorn
• 1 tablespoon dill seeds
• 1 tablespoon fennel seeds
• 2 teaspoons whole cloves
• 2 teaspoons celery seeds
• 2 teaspoons crushed mace blades
• 8 crushed bay leaves
• 1 (1-inch) section dried ginger
• 1 small dried hot red pepper

We are on day six of pickling, (we left them whole therefore its taking longer) and let me tell you, they smell like summer for a fat kid. LOVES it. Way better than vlasics , kids. Way better!

Happy weekend pickling!
Love,
Whit

Thursday, July 29, 2010

Christ on a Croissant! That is some good Pasta!


Yes I did just say that. Mario Batali, I am gunning for your job.  Run fast and quick in your little orange crocks to JFK, and catch the next flight back to Italy my friend.  For years I have loved you, and your calf high socks. I have wondered how amazing you must be, to be able to dress that way, you obviously have food authority. But my dear Mario, the secrets out… My pasta. IS. GOOD. Not like, hey, good job, Whit!  More like “Ballzangna. This is wonderful!”

Kids, Mom has found her calling. When you love carbs like I do, it is natural to feel the way I feel about pasta.  It’s the greatest and best food in all the land.  I will say it. I could eat pasta for dinner every night. (Obviously I practice restraint otherwise I would look like the side of a barn) But seriously, eating pasta is like a big hug.  It’s like you worked a long hard day, walked in the door and your grandmother is there to give you a big ole hug.  On a plate, I mean….  Anyway, before I get into the details, you have to meet some people who were instrumental in helping me find my calling.
I mentioned her to you before, but it’s time you properly met my girlfriend, Suzy.  

Without her, none of this amazing culinary skill would have come to fruition.  She is a racy red 10 speed 5 qt. Kitchenaid Mixer and she completes me.  She purrs at all of my jokes, doesn’t talk back, and knows what I want her to do without asking me stupid questions. Recently, Dad felt that Suzy was lonely and needed a friend to help her out in the kitchen, so he bought her Gonzo.  Gonzo and Suzy are like 2 peas in a pod.  He’s the gun in her holster. Bonnie and Clyde of the kitchen.  I could go on for days but it would get rapidly less funny so we will leave it at that.
Dad.  You may have heard of him as he has many names.  The man, the myth, the legend, the hair. This, is Dad.

He will answer to any of the follow: Brian, Abraham, Brian Abraham, Glorious Hair, Resident Jew, or Dad.  He’s there in my kitchen, eating my scraps and tripping me up.  He’s washing my dishes, grating my parmesan, pouring my wine, and setting my tables.  He’s burning my mushrooms and and buying me Gonzos for my birthday.    You may wonder why we are calling him Dad when he obviously is too young to have sired this prodigy. (I spelled that progidy for about 4 rounds wondering why the word was underlined…yea, right, prodigy..)  So back to why we call him Dad.  See, a lot of our friends refer to us as Mom and Dad, I am not sure if I started it or if they did, but regardless, don’t ask questions. (Fine I started it, as a derivative of Sugar Daddy.) Just run with it.  Trust me when I say that none of us want to know what the world would be like without Dad, so Three Cheers for Sugar Daddy! (insert evil laugh here)
Christ. Ona. Croissant! Have I told you how good this pasta was?!?  I fear I have ruined my life, because when I don’t feel like cooking, I make pasta and my zippy good tomato sauce. Now dried pasta is going to taste like jarred pasta sauce. The last time I tried to use jarred sauce, I spit it out. The sodium practically did a river dance in my mouth. Not a good river dance. Like a “you are drunk and doing toe touches” river dance. Therefore, in the last year and a half, I haven’t even LOOKED at jarred pasta sauce.  And after you know how to make mine, you won’t either.  I do feel weird about telling you this recipe.  I feel protective over these recipes I make up and I worry someone’s going to steal them and not credit me one day if they publish it and then they will be a babillionaire and I will be all poor saying “What the flip, this is MY ZIPPY SAUCE?!?!?” (DID ANYONE WATCH TOP CHEF LAST NIGHT? SACRELIG!) Anyway, the only people who read this here blog are my friends and I don’t think they are going to publish a cookbook anytime soon. So I should get off my worry rock and make your life better by telling you all these recipes!  Now you know I get anxiety about sharing my creations.  It’s a growing trust I am building with you here.  I will make you a promise that if I use someone else’s recipe, I will tell you who it belongs to.  I will only claim what is mine. (WHO WAS THAT? THAT GOT A LITTLE TOO SERIOUS IN HERE.)
And I am back. I was momentarily possessed by a serious monster.  Pasta. Zippy Sauce. First off you should know that I checked about 22 different pasta recipes before I settled on one.  Do you know what is in pasta? Eggs and flour. Sometimes water.  What the hell was I stressing about?  I was all “Well it’s the first time and I want it to be special?!!?”  This is not my virginity we are talking about here. Its pasta, so put on your damn apron and mix some eggs and flour.  I cannot tell you how paranoid I was about picking the wrong recipe. How funny?  So naturally, when I stress and am trying something new for the first time, I go to my best gal, Martha Stew.  She has never let me down, and even when she was temporarily detained she still knew what was up! (Lemons.) So without further ado Martha’s basic, probs can’t mess it up pasta. I got this out of my copy of Martha Stewart’s Cooking School: Lessons and Recipes for the Home Cook. If you don’t own this, Good Heavens BUY IT. (shameless free advertisement for Martha in hopes that she discovers me and makes me her bia)
  • 2 cups Italian "00" flour, substitute all-purpose flour, plus more for dusting
    • I hear a lot about this “00” flour.  It is supposedly the best of the best for pasta making, it’s just hard to find. Don’t stress, it’s not worth it. AP flour worked like a charm for me.
  • 4 large eggs
  • Pinch of Salt
Making pasta by hand? I’m sorry. Have fun with this down here.
Crack eggs into well, and beat lightly with a fork. Gradually bring small amounts of flour into the well, and incorporate into eggs using the fork. When most of the flour has been incorporated, use a bench scraper to fold the rest of the flour into the dough quickly. Once all the flour has been incorporated, knead the dough on a clean surface lightly dusted with flour until it is completely smooth and elastic, about 10 minutes. Cover dough with an inverted bowl or a piece of plastic wrap, and let rest at room temperature for 1 1/2 hours, or overnight in the refrigerator.
            Making pasta with a Suzy / Gonzo? YEAS.
Sift the flour into your Suzy’s bowl. Throw in that pinch of salt.  Make a well out of the flour and pour your ALREADY beaten eggs into the well. Some people say to start out with the paddle and switch to the dough hook. I just used the dough hook because the mound of dishes in my sink were astronomical at that point. Turn Suzy on slow speed for say, 4-5 minutes or until all the dough balls up around the dough hook.  Take it out, knead it for a few (2 minutes), wrap it in plastic wrap on the counter for MINIMUM 30 minutes or up to 1 1/2 hours, or overnight in the refrigerator. 
You may be wondering why it says to knead for 10 minutes in the “by hand” recipe and only for a few in the mixer recipe.  Well, Suzy takes a lot of the grunt work out of it for you.  No need to murder the gluten in your pasta dough, just knead it until its elasticity seems to feel right.
After the pasta had rested I took it to the cutting board.  You should cut your pasta in to equal, palm sized portions to work with. Keep the portions you are not working with covered with clean kitchen towels.  This is important because you don’t want your dough to dry out.  With a floured cutting board, roll out your palm sized pasta dough portion until its about the size of your hand.  Run it through the thickest setting of your Gonzo roller once as it is, then fold the dough in thirds, rotate 90 degrees and put through the roller. Do this step 3 times. (you will see the dough come together really well by this third round. Should feel very smooth and elastic) Then move the setting on Gonzo to the next thickest setting, run it through twice. Following, run it through the following settings once until you achieve your desired thickness. (I stopped at 4 away from the thinnest)
If you are rolling out by hand, make sure you have a well floured cutting board and keep flour on hand if your dough starts to stick. Continue to roll the dough out by rotating it clockwise 90 degrees after each few rolls to keep a uniform shape.  I don’t know how long this will take you because I didn’t do it this way, but I should think it would take you about a fortnight.
Once your dough it at its desired thickness, go ahead and pass it through you Gonzo cutter attachment, or cut it yourself with a nice sharp knife.  After you’ve cut your pasta, make sure its all separated.  In order to keep it from sticking, dust it in semolina flour or corn meal to keep it from sticking to itself.  Make a nice little birds nest out of the bunch on a baking sheet until ready to use. Then take your second piece of palm-sized pasta dough and repeat the above steps! If you want to dry it out, leave it there over night and then store it in an air tight container for up to 2 weeks.
 (sorr about the no make up, it was the day after my birthday...)
WHEW I am tired just telling you about it!  It goes a lot faster than it sounds like it, and trust me it is worth it.  Now onto the star of the dish, my zippy pasta sauce.
I actually have never written this one down either (can you tell I’m an eyeball cook?) So here is hoping I can quantify this properly for you. 
2 cans of diced or whole stewed (whichever you prefer) ORGANIC tomatoes.
Don’t mess around here. Get the good stuff.  If you can find San Marzano great! They are not everywhere so no biggie if you can’t just get the best quality you can find.
1 can of ORGANIC tomato sauce. 
(if you can get the same brand as the diced or whole tomatoes this works well, as they are usually from the same farm or crop and they have the same flavor profile.)
2 sweet onions
            (Vidalia, or any other sweet variety)
2-4 cloves of garlic.
Depends on how much you like garlic. I love it.
1 teaspoon Crushed red pepper
½ teaspoon Cayenne
1 tablespoon Dried oregano, basil, thyme mixed
1 ½ teaspoons Garlic salt

Finely chop the garlic and onions and simmer on medium low heat in olive oil until they are soft and turning slightly translucent.  Add the diced or whole tomatoes.  If they are whole, break them up with a wooden spoon.  I like my pasta chunky, so I leave the diced ones as they are if I’m using those. Let those simmer until they start to smell sweet (10 minutes, maybe.) Add the tomato sauce and simmer for 5 minutes.  Then add the dried herbs, crushed red pepper, garlic salt, salt and pepper and simmer for 25 minutes, stirring every now and then.  If the sauce looks too thick you can add some of the pasta water before mixing with the pasta. (I always do) If for some reason it looks thin, UR DOIN IT WRONG.  Cook it longer.

Always mix the pasta in the sauce before plating it. Don’t just pour sauce on pasta, it’s illegal to do it. Give her a good mix in the sauce pan before dishing her up!  


(sorr its have eaten... we were excited...)
I dare you to make this and not have someone fall in love with you. I dare you.

Go ahead, charm the panties of someone with this! Mario Batali, I was kidding before about what I said, about you running to JFK to catch a flight. I like you, don’t go.  You have red hair and you make good carbs too.

Happy best meal of your life!

Love,
Whit


Wednesday, July 28, 2010

Fat. Kid.


I gotta tell you. I am not sure if you know.  I’m a fat kid. I am such a fat kid, that I baked my OWN birthday cake, because heaven forbid someone else shows up with a cake that is, GASP, not covered in Chocolate.
This goes back to my 4 main food groups, carbs, chocolate, cheese and tomato.  Seriously guys, I love me some cake with chocolate, on, around, or in it. All over it. Any which way, who cares! It makes cake worth eating.  You will die of laughter when you hear that I actually haven’t even eaten a piece of this birthday cake, because I was so hung up on the frosting that I didn’t feel like ruining the bliss. I did have about 2 bites of the cake and went back to the buttercream…Say it with me friends: FAT. KID.  The totally terrible news is that I still have 12 ounces of this kickass chocolate buttercream left.  Know what’s scary about buttercream? 6 sticks of butter.  I shit you not. 
Did you have a piece of my birthday cake? Oh, sorry about that stick of butter… in your arteries.  It is a dangerous dance, eating at my place!  One of my favorite gals, Deb, over at Smitten Kitchen claimed to have the “Best Yellow Layer Cake” and you know me, if it’s got a name like that, I am going for it!  I share the no box philosophy with her, so it was nice to see just a basic cake recipe that could knock it out of the park.  I do believe I made the mistake of baking this cake the night before and letting it sit overnight before frosting it.  Sadly, the cake was a little dry.  I do believe if I had frosted it Friday night, it would have kept moist to Saturday.  (Stop it! Stop the judging me!  I had to make pickles, 2 different kinds of beef burgers, veggie burgers, shrimp skewers, and a compound butter for the corn on Saturday. I was a little busy.)  All of this cooking led up to Sunday, cooking day of the year, when I debuted my first batch of fresh pasta. You will hear about this tomorrow, and you will probably knock down my door to get to my fridge. It was that good. But for now, Let there be cake!


While this is a great recipe, I don’t know that it’s my absolute favorite.  I will however, give her another ride and see if I can moisten her up a bit.  Deb, if you are out there reading this, tell me what I did wrong!


Best Yellow Layer Cake via Smitten Kitchen
Yield: Two 9-inch round, 2-inch tall cake layers
4 cups plus 2 tablespoons cake flour (not self-rising)
2 teaspoons baking powder
1 1/2 teaspoons baking soda
1 teaspoon salt
2 sticks (1 cup) unsalted butter, softened
2 cups sugar
2 teaspoons pure vanilla extract
4 large eggs, at room temperature
2 cups buttermilk, well-shaken
Preheat oven to 350°F. Butter two 9-inch round cake pans and line with circles of parchment paper, then butter parchment.
Sift together flour, baking powder, baking soda, and salt in a medium bowl. In a large mixing bowl, beat butter and sugar in a large bowl with an electric mixer at medium speed until pale and fluffy, then beat in vanilla. Add eggs 1 at a time, beating well and scraping down the bowl after each addition. At low speed, beat in buttermilk until just combined (mixture will look curdled, don’t stress!). Add flour mixture in three batches, mixing until each addition is just Incorporated.
Spread batter evenly in cake pan, then rap pan on counter several times to eliminate air bubbles. (I like to drop mine a few times from two inches up, making a great big noisy fuss.) Bake until golden and a wooden pick inserted in center of cake comes out clean, 35 to 40 minutes. Cool in pan on a rack 10 minutes, then run a knife around edge of pan. Invert onto rack and discard parchment, then cool completely, about 1 hour.


Chocolate Buttercream Frosting adapted from Ina Garten’s version
Yeilds: A babillion cups. Enough for 2 cakes.
1 pound bittersweet chocolate (16 oz.) (use the good stuff here kids)
12 ounces semisweet chocolate
5 egg whites, at room temperature
1 1/2 cups granulated sugar
1/4 teaspoon cream of tartar
3/4 teaspoon kosher salt
1 1/2 pounds unsalted butter, at room temperature (that is 6 sticks people.)
3 teaspoons pure vanilla extract (I use Mexican, and so should you.)
3 teaspoons instant espresso powder, dissolved in 1 1/2 teaspoons water

Chop the chocolates and place them in a heat-proof bowl and heat over a double broiler. (Send me an email if you don’t know how to do this and Super Bouche will rescue you) Stir until melted and set aside until cooled to room temperature.
Mix the egg whites, sugar, cream of tartar, and salt in your kitchenaid (hereto referred to as Suzy) fitted with a whisk attachment. (You can use a hand mixer if you don’t have a Suzy) Place the bowl of egg whites over the pan of simmering water and heat the egg whites until they are warm to the touch, about 5 minutes. (For the love of Jesus, don’t let the eggs cook. Make sure the bowl doesn’t touch the water) Return the bowl to Suzy and whisk on high speed for 5 minutes, or until the meringue is cool and holds a stiff peak.
Add the butter, 1 tablespoon at a time, while beating on medium speed. Scrape down the bowl, add the melted chocolate, vanilla, espresso, and mix for 1 minute or until the chocolate is completely blended in. If the buttercream seems very soft, allow it to cool, and beat it again.

Try not to go into cardiac arrest and the amazing quality of this buttercream. 
Guys, I am hearing amazing things are happening with the veggie burger recipe! For those of you making it, please please let us know how it goes!  This is my baby and I want to hear how she treats you.  (I am not above smacking her around if she doesn’t behave)
Happy Hump Day!
Love,
Whit

Tuesday, July 27, 2010

The Holy Grail of BBQ.

Over here at la bouche we have been getting lots of requests for one particular recipe. Actually, I have been getting requests for this recipe from the beginning of its creation and there is only one reason why I never give it out. Because it’s involved. And I am lazy. And I don’t have a recipe for it written down… it is muscle memory to me at this point. But now that you are all here just waiting for me to give you the holy grail of bbqing, and it certainly is bbq season, I can’t knowingly withhold this from you any longer. You should know how hard it is for me to quantify this recipe and know that I am doing you a SOLID.

The Veggie Burger. It’s sweet, it’s savory, it’s tender, it is legendary. I don’t know about you, but I have a lot of friends who are vegetarian or prefer not to eat meat. Do not get me wrong, I love the cow. I think it is the symbol of America (I am from Kentucky, what do you want) and it tastes like heaven on a hot summer day, however, these veggie burgers. Are. Bomb. And you will not miss the red meat here kids.

Without further delay…
Whitney’s Famous Veggie Burgers
(yes they live up to this name, don’t sell a chicken for less than its worth)

Ingredients

• 3 tablespoons olive oil
• 3/4 cup fresh corn kernels shucked from the cob and finely processed
• 6 mushrooms, finely processed
• 2 scallions, finely processed
• 1/2 red bell pepper, finely processed
• 1 clove garlic, finely processed
• 1 tablespoon cumin
• 1/8 teaspoon garlic salt
• 1/8 teaspoon cayenne pepper
• 1 cup fresh spinach, finely processed
• 1 carrot, peeled and processed
• 1 medium sweet potato, peeled finely processed (although buy 2 in case you need more)
• 1 egg white
• Salt and pepper
• 1-2 cups fresh bread crumbs (use as needed)

Directions

In your food processor, process sweet potato until finely grated. Next process the carrot. Set sweet potato and carrot aside in its own bowl. Process the remaining vegetables (mushroom, corn, red bell pepper, garlic, spinach, scallions) Do not be worried if these give off a little liquid. It is good juice and unless it’s like ½ cup of liquid, keep it. In a large skillet heat 1 tablespoon of olive oil over medium high heat. Stir in the carrot and sweet potato, cook for 2 minutes. Add in remaining vegetables. Cook for 2 minutes. Add cumin, cayenne, garlic salt, salt and pepper and cook for 30 seconds. Let cool slightly for 5 minutes (so as not to cook your egg white) Add egg white and stir in enough bread crumbs so that the mixture holds together. (this is different every time. it depends on how much liquid its retaining.) Shape mixture into disks (slider sized is best for keeping them from breaking) and place on a baking sheet. Chill for 1 hour. These are really tender, so you have to be ginger when handling them.

Heat 2 tablespoons olive oil in non-stick skillet on medium high heat. (Think of these as scallops, you want a really hot pan to sear the outside and give you a firm base.) and cook veggie burgers until golden brown on each side. I would say to cook these for 7-10 minutes per side. DO NOT mess with them unless you smell them burning before 7 minutes. They can break apart on you unless they sear.

Now, having tried to cook these in the oven and on the grill and in the pan, just trust me when I say that the pan is the way to do it. The grill (even when using foil) really makes them fall apart and when using the oven, you miss that crisp outside.

These pair well with about any cheese or are good on their own. Some friends have been using guacamole on theirs in recent bbqs, and that looked GOOD.

So I hope you enjoy the most powerful weapon in my arsenal. I am defenseless now and can no longer out-barbque you since you know my tricks. I will however leave you with one question. Who brought up the idea of toe touches and herkies at my birthday party?


Happy BBQing! Love,
Whit

Monday, July 26, 2010

Hair of the Dog,,,or cat....


Whelp, it is Monday and it is no surprise that I am exhausted, because Saturday was my birthday, and it was a ragefest, ladies and gents!  A big thanks for the elevator birthday serenade and a very special thanks to Brian the Grillmaster, who kept it possible for me to socialize by feeding the masses. (And for having amazing grill hair.)

I spent 97.4 percent of this weekend cooking which means many great things are coming your way.  To start we have hair of the cat margaritas.  Now I know EXACTLY what you are thinking, “whitney, you don’t cook margaritas, what the flip!” Well yes you do so chill.
Now, I am a fan of the no mix margarita, which is made up of booze and citrus.  There is no need for a mix and if you like a mix margarita, go away.  I am kidding, only a little.  If I were running for margarita president I would be egalitarian and say “I love all margaritas just the same” however, I am not running for margarita president and these are not my margarita children, so I can say without a doubt that these margs are better than Tarascas. (That’ll show you for not letting me take those margaritas across the street last week, Tarasca!)

Behold, Hair of the Cat Margarita!
  • Coarse salt
  • Ice cubes
  • 1 1/4 cups freshly squeezed lime juice
  • 1 cup best-quality white tequila (PATRON preferred but jose will do)
  • 1/2 cup Cointreau
  • 2-4 tablespoons of lime simple syrup
    • Zest of 1 lime, ¼ cup water, ¼ cup sugar
Directions
 Juice your limes people, do not use bottled juice. Also, don’t short yourself on the juice, as this is the only non-alcoholic liquid going into your marg.  (Don’t pull a Brian and read the recipe wrong either. I suspect more people would have drank these if it had the full 1 ¼ cup of juice instead of JUST ¼ cup… Champion.)
Heat the water, sugar and lime zest until the sugar is dissolved.  (The cooking part I was talking about, BHAHA!) This is your sweetening agent so use it to taste, but it should be 2-4 tablespoons. Mix all the ingredients together in a sweet looking margarita pitcher. Serve on the rocks. With salt. Boom.
Many more things to come - freshly made pasta, veggie burgers, birthday cake, and a spectacular corn on the grill.  Until then, get your drink on, like these two booze hounds!

 Happy recovery! Love, 
Whit

Thursday, July 22, 2010

Carbtastic


There is nothing quite like the carbohydrate.  I find that I eat 4 main food groups that consist of carbs, tomatoes, cheese and chocolate.   It’s a great diet, you should try it.  I am always happy with a carb on my fork and most of the time I regret those last four bites but hey, that’s what unbuttoning your pants are for, am I right?!?
Back to the carbs at hand, bread pudding. Now if you don't like bread pudding, you can just get out!  Seriously it is un-American to not like bread pudding and I may judge you if you say otherwise.  Last night our Frat Brother Todd came over for dinner and I made enough food to warrant the last meal before the apocalypse.  The plan was to cook 2 full chickens earlier in the week the night Todd came over so there would be plenty of meat and then I could use the left-overs for Chicken Marsala, which we all know Brian already had the distinct pleasure of ruining this week… However we had Todd over later in the week, so now we have lots of meat and only a few recipes left with which to work.  I’m not mad about this, because the bird is good. REAL nice. So, 2 birds, roasted carrots and onions, a cheddar and leek bread pudding and a mixed berry bread pudding. Fat much?
I plan on doing an entire series on how to roast the hell out of a bird, so I’m not going to spend much time on it now. But I will tell you the key to a fantastic bird is to be liberal with the butter, in, around, on, and under the skin. GET ON IN THERE, don’t be shy.  Lots.  Sorry for ruining your diet with my roast chicken, but in my house, that’s how it’s gonna be.  

I will however, tell you about the tale of 2 bread puddings and how it rocked my world last night. Once upon a time last week at the farmers market, I stumbled across a gorgeous loaf of brioche which spoke to me in a seductive way. He said “I am soft and sweet and I am begging you to put me in your oven” To which I obliged. Since we are a 2 person household, an entire bread pudding casserole as a side is a little overkill.  I had all this bread and I thought, oh Gee how will I use you before you go bad, little bread loaf? Oh DUH lets make 2 different ones. (I know the logic is off. But it’s how my brain works.) SO I had a conference call with my gal Martha and she told me about this leek and gruyere bread pudding. Now, in moderation I can eat gruyere, but we aren’t talking about moderation we are talking about bread pudding so naturally I switched this recipe to include my best girl friend, white sharp cheddar.  When you change one element of a recipe you can’t just go haphazardly, you have to respect the flavor components of the cheese. Gruyere and Cheddar, are not sister, or kissing cousins even. Gruyere is France and Cheddar is Wisconsin.  So after some changing around, below is my adapted recipe for Cheddar and Leek Bread Pudding. 

White Sharp Cheddar and Leek Brioche Bread Pudding
  • 3 tablespoons unsalted butter, plus more for baking dish
  • 4 leeks, white and pale-green parts only, thinly sliced crosswise, rinsed well
  • 2 garlic cloves, crushed
  • 1/3 cup dry white wine
  • 1 1/2 cups heavy cream
  • 1 cups whole milk
  • 1/2 teaspoon freshly grated nutmeg
  • Pinch of paprika
  • 2 teaspoons coarse salt
  • 1/4 teaspoon freshly ground pepper
  • 3 large eggs plus 1 large egg yolks, lightly beaten
  • 1 loaf day-old brioche,crusts removed, cut into 3/4-inch slices and then halved crosswise
  • 1 cups grated White Sharp Cheddar cheese
  • 1/2 cup grated Fontina cheese
Preheat oven to 350 degrees. Butter a 10-inch (10-cup) round baking dish. Melt butter in a medium saucepan over medium heat. Add leeks and garlic; cook, stirring often, until soft, about 10 minutes. Add wine; bring to a boil. Cook until reduced by half. Transfer half of the leek mixture to a bowl, and reserve.
Whisk cream, milk, nutmeg, paprika, salt, and pepper into leek mixture in pan; bring to a simmer. Temper egg with cream mixture. (Add 1/2 cup hot cream-leek mixture to eggs and yolks in a medium bowl, whisking. Whisk in another cup cream-leek mixture; return egg-leek mixture to pan.) Cook, whisking, until thickened, 3 minutes.  Be sure to keep an eye on this. Timing is sensitive and you don’t want the custard to separate.
Arrange 8 or 9 pieces of bread in prepared dish. Pour 2 cups egg-leek mixture over bread. Sprinkle half the reserved leeks and half the cheeses over bread. Let stand 10 minutes. Arrange remaining bread in a slightly overlapping circle on top, and then add remaining egg-leek mixture. Sprinkle with remaining leeks and cheeses. Let stand 10 minutes.
Cover dish loosely with foil, and place in a small roasting pan. Add enough hot water to reach halfway up sides of dish. Bake until golden brown and set, about 55 minutes. Remove foil, and bake until deep golden brown, about 20 minutes more. Let cool in dish on a wire rack. Serve warm or at room temperature.

Now to counteract that savory hot mess, we move straight along to the mixed berry bread pudding.  I got these INCREDIBLE blackberries and some raspberries (If the blackberries and the raspberries are in an arm wrestling match the raspberries get owned, but they were still good…) which needed to be used before going south.  Cue the mixed berry goodness!

Mixed Berry Brioche Bread Pudding

·         Butter for ramekins
·         4 eggs
·         3/4 cup whole milk
·         3/4 cup heavy cream
·         1 tablespoon vanilla extract
·         1 teaspoon lemon zest
·         1/2 cup sugar, plus more for dusting and topping
·         4 large slices brioche bread
·         2 cups mixed berries (blueberries, strawberries, raspberries, blackberries or whatever you have on hand), plus more for garnish

Lemon Fondant:

·         2 cups powdered sugar
·         2 tablespoons water
·         2 lemons, zested and juiced
Butter and sugar 6 (6-ounce) ramekins.
In a medium bowl, whisk together the eggs, milk, cream, vanilla extract, lemon zest, and sugar. Combine well with a whisk - then let it settle so there are no air bubbles on the surface otherwise these will cause lumps in your anglaise.
Preheat the oven to 350 degrees F.
Tear the brioche up into large pieces using your hands, add to the custard mixture and toss to combine. Equally divide the berries among the ramekins and top with the bread mixture. Gently press down so they are packed evenly. Sprinkle with more sugar, then refrigerate for 10 to 15 minutes to let soak.
Bake for 25 minutes in the center of the oven. (you can choose to do this in a water bath, I didn’t only because at this point I didn’t have room in the oven!) The pudding is ready when it has puffed up and the custard is set. The top should be a nice golden color. Remove and allow to cool slightly.
Make the fondant. In a mixing bowl combine sifted powdered sugar, water, lemon zest and juice.
Once the pudding has cooled slightly, invert onto an individual serving plate. Drizzle the lemon fondant over warm bread pudding and serve with extra fresh berries.

Thus a tale of 2 bread puddings was born and immediately put to sleep. In my belly.
Happy carb loading!
Love,
Whit